前言: 此篇主要涉及pytorch的入门内容,主要是张量的基础操作以及使用pytorch进行反向传播,最后还简要介绍了pytorch的一系列常用的基础组件,以便对后续更深层次的学习任务奠定基础。
一、创建张量 1.1 简单张量 根据已有数据创建张量,torch.tensor默认数字类型是float32
1
2
3
4
5
6
7
8
9
10
11
12
13
14
15
def test0 (): data = torch.tensor(10 ) print (data) data = np.random.randn(2 ,3 ) data = torch.tensor(data) print (data) data = [[[i for i in range (10 )],[j for j in range (10 ,20 )]]] data = torch.tensor(data) print (data) test0()
tensor(10)
创建指定形状张量
1
2
3
4
5
6
7
8
9
def test1 (): data = torch.Tensor(2 ,3 ) print (data) data = torch.Tensor([2 ,3 ]) print (data) test1()
tensor([[1., 1., 1.],
创建指定类型张量,传递数据如果不匹配会发生类型转换
1
2
3
4
5
6
7
8
9
10
11
def test2 (): data = torch.IntTensor(2 ,3 ) print (data) data = torch.FloatTensor(2 ,3 ) print (data) test2()
tensor([[772014944, 1301, 0],
1.2 线性张量和随机张量 创建线性张量
1
2
3
4
5
6
7
8
9
10
11
12
def test3 (): data = torch.arange(0 ,10 ,2 ) data = torch.Tensor(data) print (data) data = torch.linspace(0 ,10 ,100 ) data = torch.Tensor(data) print (data) test3()
tensor([0, 2, 4, 6, 8])
创建随机张量
1
2
3
4
5
6
7
def test4 (): torch.random.manual_seed(42 ) data = torch.randn(2 ,3 ) data = torch.Tensor(data) print (data) test4()
tensor([[ 0.3367, 0.1288, 0.2345],
1.3 指定值张量 1 2 3 4 5 6 7 8 9 10 11 12 13 14 def test5 (): data = torch.zeros(2 ,3 ) print (data) data1 = torch.zeros_like(data) print (data1) data = torch.ones(2 ,3 ) print (data) data = torch.full([2 ,3 ],6 ) print (data) test5()
tensor([[0., 0., 0.],
1.4 张量元素类型转换 1 2 3 4 5 6 7 8 9 10 11 12 def test6 (): data = torch.full([2 ,3 ],6 ) print ("转换前" ,data.dtype) data1 = data.type (torch.FloatTensor) print ("转换后" ,data1.dtype) data2 = data.float () print ("转换后" ,data2.dtype) test6()
转换前 torch.int64
二、数值计算 2.1 张量的基本运算 加减乘除相反数
1 2 3 4 5 6 7 8 9 10 11 12 13 14 15 16 17 18 19 20 21 22 23 24 def test0 (): torch.random.manual_seed(40 ) data = torch.randint(0 ,10 ,[2 ,3 ]) print (data) tensor = torch.randint(0 ,10 ,[2 ,1 ]) print (tensor) data_add = data.add(tensor) print ("data_add" ,data_add) data_sub = data.sub(tensor) print ("data_sub" ,data_sub) data_mul = data.mul(data_sub) print ("data_mul" ,data_mul) data_div = data.div(tensor) print ("data_div" ,data_div) data_neg = data.neg() print ("data_neg" ,data_neg) test0()
tensor([[8, 3, 5],
1 2 3 4 5 6 7 8 9 10 def test2 (): data1 = torch.tensor([[1 ,2 ],[3 ,4 ]]) data2 = torch.tensor([[5 ,6 ],[7 ,8 ]]) data = data1.mul(data2) print (data) data = data1*data2 print (data) test2()
[-7, -2, -4]])
修改原数据的运算,不需要额外变量来接收运算结果
直接在原有运算方法名后面加下划线
1 2 3 4 5 6 7 8 9 def test1 (): torch.random.manual_seed(40 ) data = torch.randint(0 ,10 ,[2 ,3 ]) print (data) tensor = torch.randint(0 ,10 ,[2 ,1 ]) print (tensor) data.add_(tensor) print ("result" ,data) test1()
tensor([[8, 3, 5],
2.2 阿达玛积 阿达玛积:张量对应位置元素相乘
1 2 3 4 5 6 7 8 9 10 def test2 (): data1 = torch.tensor([[1 ,2 ],[3 ,4 ]]) data2 = torch.tensor([[5 ,6 ],[7 ,8 ]]) data = data1.mul(data2) print (data) data = data1*data2 print (data) test2()
tensor([[ 5, 12],
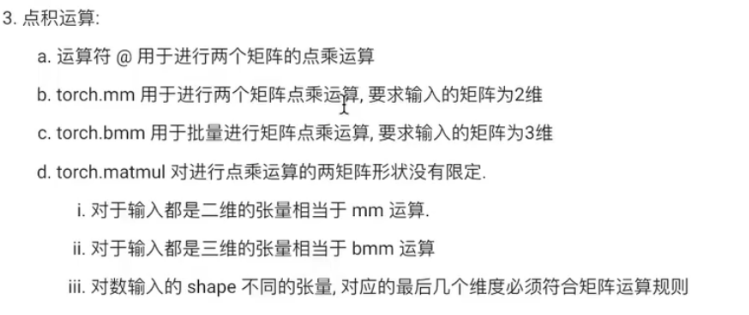
2.3 点积运算 1 2 3 4 5 6 7 8 9 10 11 12 13 14 15 16 17 18 19 20 21 22 23 24 25 26 27 28 29 30 31 32 33 def test3 (): data1 = torch.tensor([[1 ,2 ],[3 ,4 ],[5 ,6 ]]) data2 = torch.tensor([[5 ,6 ],[7 ,8 ]]) data = data1@data2 print ("@" ,data) data1 = torch.tensor([[1 ,2 ],[3 ,4 ],[5 ,6 ]]) data2 = torch.tensor([[5 ,6 ],[7 ,8 ]]) data = torch.mm(data1,data2) print ("mm" ,data) torch.random.manual_seed(40 ) data1 = torch.randn(3 ,4 ,5 ) print (data1) data2 = torch.randn(3 ,5 ,8 ) data = torch.bmm(data1,data2) print ("bmm" ,data.shape) data1 = torch.randn(4 ,5 ) data2 = torch.randn(5 ,6 ) data = torch.matmul(data1,data2) print ("matmul1" ,data.shape) data1 = torch.randn(3 ,4 ,5 ) data2 = torch.randn(3 ,5 ,8 ) data = torch.matmul(data1,data2) print ("matmul2" ,data.shape) test3()
@ tensor([[19, 22],
[[ 0.4827, 0.4881, -1.8173, 1.0127, 1.3802],
[[-0.3522, 0.9055, -0.1248, -0.1938, -0.3097],
三、 数值转换 3.1 tensor张量转numpy数组 转换后的两个数据共享内存地址,可以使用copy()来区分开来
1 2 3 4 5 6 7 8 9 10 11 12 13 14 15 16 17 18 19 20 21 22 23 24 25 26 27 28 29 30 31 32 def test0 (): data_tensor = torch.tensor([1 ,2 ,3 ]) data_np = data_tensor.numpy() print (data_tensor,type (data_tensor)) print (data_np,type (data_np)) data_tensor[0 ] = 2 print ("修改tensor后" ) print (data_tensor) print (data_np) data_np[0 ] = 3 print ("修改numpy后" ) print (data_tensor) print (data_np) data_tensor = torch.tensor([1 ,2 ,3 ]) data_np = data_tensor.numpy().copy() data_tensor[0 ] = 2 print ("修改copy的tensor后" ) print (data_tensor) print (data_np) data_np[0 ] = 3 print ("修改copy的numpy后" ) print (data_tensor) print (data_np) test0()
tensor([1, 2, 3]) <class ‘torch.Tensor’>
3.2 numpy数组转tensor张量 1 2 3 4 5 6 7 8 9 10 11 12 13 def test1 (): data_numpy = np.array([2 ,3 ,4 ]) data_tensor1 = torch.from_numpy(data_numpy) data_tensor_copy = torch.from_numpy(data_numpy.copy()) print (data_tensor1) data_tensor2 = torch.tensor(data_numpy) print (data_tensor2) test1()
tensor([2, 3, 4])
3.3 标量张量和数字的转换 使用item()提取数字,只适用于张量中只有一个元素的情况
1 2 3 4 5 6 7 8 9 10 11 def test2 (): data1 = torch.tensor(0 ) data2 = torch.tensor([10 ]) data3 = torch.tensor([[20 ]]) print (data1.shape,data2.shape,data3.shape) num1 = data1.item() num2 = data2.item() num3 = data3.item() print (num1,num2,num3) test2()
torch.Size([]) torch.Size([1]) torch.Size([1, 1])
四、拼接操作 4.1 torch.cat(连接操作)
功能:沿指定维度连接多个张量,输入张量的形状(除拼接维度外)必须完全相同。
不新增维度,仅扩展现有维度的大小。
适用于需要合并数据但无需新增维度的场景(如拼接多个特征向量)。
1 2 3 4 5 import torchx = torch.randn(2 , 3 ) y = torch.randn(2 , 3 ) z_cat = torch.cat([x, y], dim=0 )
4.2 torch.stack(堆叠操作)
功能:在新创建的维度上堆叠多个张量,所有输入张量的形状必须完全一致。
新增一个维度,堆叠后的张量比输入张量多一维。
适用于需要创建批次维度或组合多个张量的场景(如创建图像批次)。
1 2 z_stack = torch.stack([x, y], dim=0 )
关键差异总结
维度变化 :cat不新增维度,stack会新增一个维度。输入要求 :cat允许拼接维度的大小不同(其他维度相同),stack要求所有维度完全一致。典型用途 :cat用于合并数据序列,stack用于构建批次或组合张量。
五、索引操作 5.1 简单行列索引 1 2 3 4 5 6 7 8 9 10 11 12 13 14 15 16 def test0 (): torch.random.manual_seed(42 ) data = torch.randint(0 ,10 ,(4 ,5 )) print (data) print (data[0 ]) print (data[0 ,1 ]) print (data[0 ][1 ]) print (data[:3 ,2 :3 ]) print (data[:3 ][2 :3 ]) test0()
tensor([[2, 7, 6, 4, 6],
5.2 布尔索引 1 2 3 4 5 6 7 8 9 10 11 12 def test1 (): torch.random.manual_seed(42 ) data = torch.randint(0 ,100 ,(4 ,5 )) print (data) print (data[data>30 ]) print (data[data[:,1 ]>=20 ]) test1()
tensor([[42, 67, 76, 14, 26],
5.3 多维索引 1 2 3 4 5 6 7 8 9 10 def test2 (): torch.random.manual_seed(42 ) data = torch.randint(0 ,100 ,(3 ,4 ,5 )) print (data) print (data[0 ,:,:]) print (data[:,0 ,:]) print (data[:,:,0 ]) test2()
tensor([[[42, 67, 76, 14, 26],
[[49, 76, 73, 11, 99],
[[86, 22, 77, 19, 7],
六、形状操作 6.1 reshape()函数 1 2 3 4 5 6 7 8 9 10 11 12 13 14 15 def test0 (): torch.random.manual_seed(42 ) data = torch.randint(0 ,10 ,[4 ,5 ]) print (data.shape) new_data = torch.reshape(data,[2 ,10 ]) print (new_data.shape) new_data = torch.reshape(data,[-1 ,20 ]) print (new_data.shape) test0()
torch.Size([4, 5])
6.2 transpose()函数和permute()函数 transpose只是简单进行维度交换,一次只能交换两个维度,permute函数在transpose基础上可以一次交换多个维度
1 2 3 4 5 6 7 8 9 10 11 12 13 14 15 16 17 18 19 20 21 22 23 def test1 (): torch.random.manual_seed(42 ) data = torch.randint(0 ,10 ,[3 ,4 ,5 ]) print (data.shape) print (data) print ("-" *50 ) data_reshape = torch.reshape(data,[4 ,3 ,5 ]) print (data_reshape.shape) print (data_reshape) print ("-" *50 ) data_transpose = torch.transpose(data,0 ,1 ) print (data_transpose.shape) print (data_transpose) print ("-" *50 ) data_permute = torch.permute(data,(2 ,0 ,1 )) print (data_permute.shape) print (data_permute) test1()
6.3 view()函数和contigous()函数 1 2 3 4 5 6 7 8 9 10 11 12 13 14 15 16 17 18 def test1 (): data = torch.tensor([[10 ,20 ,30 ],[40 ,50 ,60 ]]) data_view = data.view(3 ,2 ) print (data_view.shape) print (data.is_contiguous()) data_transpose = torch.transpose(data,0 ,1 ) print (data_transpose.is_contiguous()) print (data_transpose.contiguous().view(2 ,3 )) test1()
torch.Size([3, 2])
6.4 squeeze()函数和unsqueeze()函数 1 2 3 4 5 6 7 8 9 10 11 12 13 14 15 16 17 18 19 20 21 22 23 24 25 def test2 (): data = torch.randint(1 ,10 ,[1 ,3 ,1 ,5 ]) print (data.shape) print (data) data_squ = data.squeeze() print (data_squ.shape) print (data_squ) data_squ_1 = data.squeeze(2 ) print (data_squ_1.shape) print (data_squ_1) print ("-" *50 ) data = torch.randint(1 ,10 ,[3 ,4 ,5 ]) print (data.shape) data_unsqu = data.unsqueeze(-1 ) print (data_unsqu.shape) test2()
torch.Size([1, 3, 1, 5])
[[6, 7, 2, 8, 8]],
[[9, 1, 8, 8, 8]]]])
七、运算函数 运算规则和numpy类似
1 2 3 4 5 6 7 8 9 10 11 12 13 14 15 16 17 18 19 def test0 (): torch.random.manual_seed(42 ) data1 = torch.randint(0 ,5 ,[2 ,3 ],dtype=torch.float64) print (data1) data2 = torch.randint(5 ,10 ,[2 ,3 ],dtype=torch.float64) print (data1.mean()) print (data1.mean(dim=1 )) print (data1.mean(dim=0 )) test0()
tensor([[2., 2., 1.],
八、反向传播 8.1 梯度基本计算 8.1.1 标量梯度计算 对于需要求导的张量需要设置参数为True,并且类型指定为小数
1 2 3 4 5 6 7 8 9 10 11 def test0 (): x = torch.tensor(10 ,requires_grad=True ,dtype=torch.float64) f = x**2 +20 f.backward() print (x.grad) test0()
tensor(20., dtype=torch.float64)
8.1.2 向量梯度计算 上面f计算出来的是一个向量,不能直接求梯度,梯度必须是在标量基础上的
用均值或求和来表示f使f变成标量
1 2 3 4 5 6 7 8 9 10 11 12 13 14 def test1 (): x = torch.tensor([10 ,20 ,30 ,40 ],requires_grad=True ,dtype=torch.float64) f = x**2 +20 print ("f" ,f) f_mean = f.mean() f_mean.backward() print (x.grad) test1()
f tensor([ 120., 420., 920., 1620.], dtype=torch.float64,grad_fn=)
8.1.3 多标量梯度计算 多标量其实大差不差,只是最后要分开访问变量的梯度值就行了
1 2 3 4 5 6 7 8 9 10 11 12 13 def test2 (): x1 = torch.tensor(10 ,requires_grad=True ,dtype=torch.float64) x2 = torch.tensor(20 ,requires_grad=True ,dtype=torch.float64) f = x1**2 +x2**2 +2 *x1 print ("f" ,f) f.backward() print (x1.grad) print (x2.grad) test2()
f tensor(520., dtype=torch.float64, grad_fn=)
8.1.4 多向量梯度计算 1 2 3 4 5 6 7 8 9 10 11 12 13 14 15 16 def test3 (): x1 = torch.tensor([10 ,20 ,30 ,40 ],requires_grad=True ,dtype=torch.float64) x2 = torch.tensor([40 ,50 ,60 ,70 ],requires_grad=True ,dtype=torch.float64) f = x1**2 +x2**2 +2 *x1 print ("f" ,f) f_mean = f.sum () f_mean.backward() print (x1.grad) print (x2.grad) test3()
f tensor([1720., 2940., 4560., 6580.], dtype=torch.float64,)
8.2 控制梯度计算 8.2.1 控制梯度计算
可以通过控制梯度计算,来设定忽略某个变量的梯度,设定后计算梯度将自动跳过
第一种方式:
1 2 3 4 5 6 7 8 9 10 11 12 def test4 (): x = torch.tensor(10 ,requires_grad=True ,dtype=torch.float64) print (x.requires_grad) with torch.no_grad(): f = x**2 print (f.requires_grad) test4()
True
第二种方式:
1 2 3 4 5 @torch.no_grad() def my_func (x ): return x**2 f = my_func(x) print (f.requires_grad)
False
第三种方式:全局禁用梯度
由于 f 是在禁用梯度计算的上下文中生成的,因此会抛出错误
1 2 3 4 5 6 7 8 torch.set_grad_enabled(False ) f = x**2 print (f.requires_grad)f.backward() print (x.grad)
8.2.2 累计梯度和梯度清零 通过循环重复对x进行计算会将历史梯度值累加到x.grad属性中,相当于通过循环多次求导
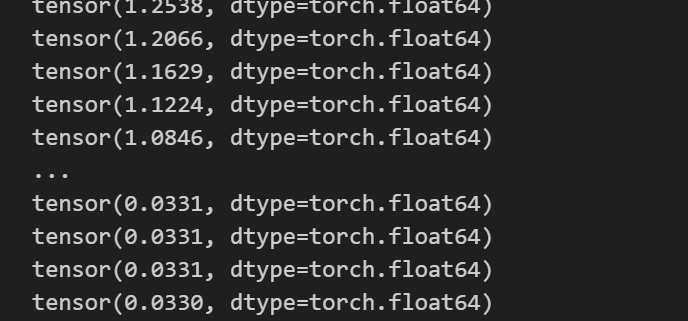
1 2 3 4 5 6 7 8 9 10 11 def test5 (): x = torch.tensor([10 ,20 ,30 ,40 ],requires_grad=True ,dtype=torch.float32) for _ in range (3 ): f1 = x**2 +20 f2 = f1.mean() f2.backward() print (x.grad) test5()
tensor([ 5., 10., 15., 20.])
但是在实际的梯度下降求解最优参数中,我们不希望这样的累加行为来影响梯度求解的结果,而是每次循环有不一样的数据来对损失函数进行优化,因此每次循环要进行梯度清零
1
2
3
4
5
6
7
8
9
10
11
12
13
14
15
16
def test6 (): x = torch.tensor([10 ,20 ,30 ,40 ],requires_grad=True ,dtype=torch.float32) for _ in range (3 ): f1 = x**2 +20 f2 = f1.mean() if x.grad is not None : x.grad.data.zero_() f2.backward() print (x.grad) test6()
在PyTorch中,梯度是累加的。这意味着每次调用 .backward() 时,计算得到的梯度会被累加到现有的梯度上,而不是替换它。如果不进行梯度清零,历史梯度会不断累积,导致梯度值变得非常大,这会影响模型的训练效果。
8.2.3 梯度下降优化算法案例 在梯度清零的基础上,我们需要更新每次循环后的参数
1 2 3 4 5 6 7 8 9 10 11 12 13 14 15 16 17 18 19 20 21 22 def test7 (): x = torch.tensor(10 ,requires_grad=True ,dtype=torch.float64) theta = 0.01 for i in range (1000 ): y = x**3 if x.grad is not None : x.grad.data.zero_() y.backward() x.data = x.data-theta*x.grad print (x.data) test7()
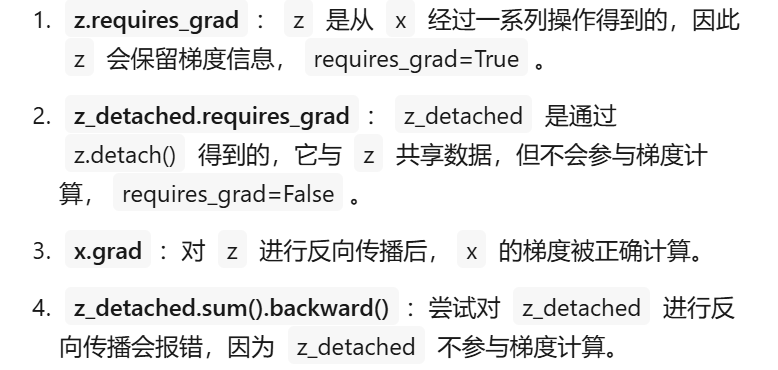
8.3 梯度计算注意 detach() 方法用于将张量从计算图中分离出来,返回一个新的张量,该张量与原始张量共享数据,但不会参与梯度计算。它的主要用途包括防止梯度传播、节省内存和优化模型推理。
8.3.1 简单演示 1 2 3 4 5 6 7 def test8 (): x = torch.tensor([10 ,20 ],requires_grad=True ,dtype=torch.float64) print (x.detach().numpy()) test8()
8.3.2 解决方案:detach()数据共享 解释:
1
2
3
4
5
6
7
8
9
10
def test9 (): x1 = torch.tensor([10 ,20 ],requires_grad=True ,dtype=torch.float64) x2 = x1.detach() print (id (x1.data),id (x2.data)) x2[0 ] = 100 print (x1) test9()
1607428373376 1607428373376
九、基础组件 1 2 3 4 5 6 import torchimport torch.nn as nnimport torch.optim as optimfrom sklearn.datasets import make_regressionimport matplotlib.pyplot as pltfrom torch.utils.data import Dataset,DataLoader,TensorDataset
9.1 基础组件的用法 9.1.1 损失函数 1 2 3 4 5 6 7 8 9 10 11 12 13 14 15 def test0 (): criterion = nn.MSELoss() torch.random.manual_seed(42 ) y_pred = torch.randn(3 ,5 ,requires_grad=True ) y_true = torch.randn(3 ,5 ,requires_grad=True ) loss = criterion(y_pred,y_true) print (loss) test0()
tensor(1.0192, grad_fn=)
9.1.2 线性假设函数 1 2 3 4 5 6 7 8 9 10 11 12 13 14 def test1 (): model = nn.Linear(in_features=10 ,out_features=5 ) input = torch.randn(4 ,10 ) y_pred = model(input ) print (y_pred.shape) print (input ) print (y_pred) test1()
torch.Size([4, 5]))
9.1.3 优化器 1 2 3 4 5 6 7 8 9 10 11 def test2 (): model = nn.Linear(in_features=10 ,out_features=5 ) optimizer = optim.SGD(model.parameters(),lr=0.01 ) optimizer.zero_grad() optimizer.step()
9.2 数据加载器的使用 9.2.1 数据类创建 如果是引用数据集,那么就自带有这个部分内容
1 2 3 4 5 6 7 8 9 10 11 12 13 14 class SampleDataset (Dataset ): def __init__ (self,x,y ): self .x = x self .y = y self .len = len (y) def __len__ (self ): return self .len def __getitem__ (self, index ): index = min (max (index,0 ),self .len -1 ) return self .x[index],self .y[index]
9.2.2 实例化数据加载类 1 2 3 4 5 6 7 8 9 10 11 def test0 (): x = torch.randn(100 ,8 ) print (x.size()) y = torch.randint(0 ,2 ,(x.size(0 ),)) print (y) sample_dataset = SampleDataset(x,y) print (sample_dataset[0 ][0 ]) print (sample_dataset[0 ][1 ]) test0()
torch.Size([100, 8])
9.2.3 数据加载类的使用 一次加载多条数据
1 2 3 4 5 6 7 8 9 10 11 12 13 14 15 16 17 def test1 (): x = torch.randn(100 ,8 ) y = torch.randint(0 ,2 ,(x.size(0 ),)) sample_dataset = SampleDataset(x,y) dataloader = DataLoader(sample_dataset, batch_size=4 , shuffle=True ) for x,y in dataloader: print (x) print (y) break test1()
tensor([[-0.5414, -1.0563, 0.2413, 0.1828, 0.6247, -0.7940, -0.6748, -0.3877],
9.3 构建简单数据类型 1 2 3 4 5 6 7 8 9 10 11 12 13 14 15 16 def test2 (): x = torch.randn(100 ,8 ) y = torch.randint(0 ,2 ,(x.size(0 ),)) sample_dataset = TensorDataset(x,y) dataloader = DataLoader(sample_dataset, batch_size=4 , shuffle=True ) for x,y in dataloader: print (x) print (y) break test2()
9.4 使用组件创建线性回归 9.4.1 构建数据集 1 2 3 4 5 6 7 8 9 10 11 def create_dataset (): x, y, coef = make_regression(n_samples=100 , n_features=1 , noise=10 , coef=True , bias=14.5 , random_state=42 ) x = torch.tensor(x, dtype=torch.float32) y = torch.tensor(y, dtype=torch.float32).view(-1 , 1 ) return x, y, coef
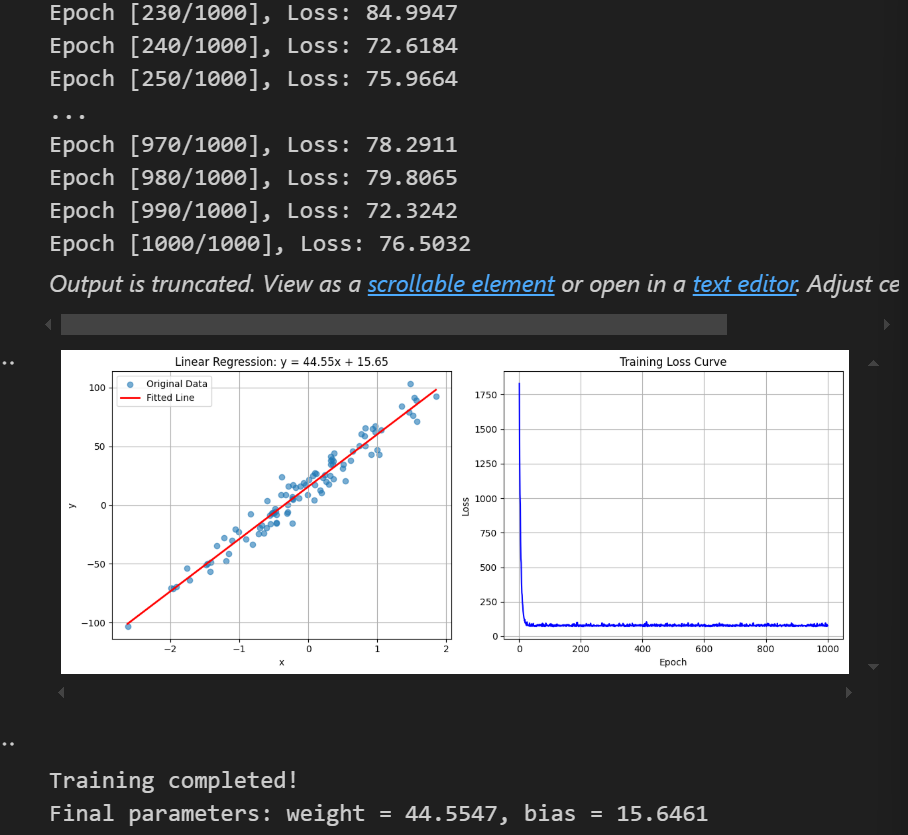
9.4.2 创建训练函数以及训练结果可视化 1 2 3 4 5 6 7 8 9 10 11 12 13 14 15 16 17 18 19 20 21 22 23 24 25 26 27 28 29 30 31 32 33 34 35 36 37 38 39 40 41 42 43 44 45 46 47 48 49 50 51 52 53 54 55 56 57 58 59 60 61 62 63 64 65 66 67 68 69 70 71 72 73 74 75 76 77 78 79 80 81 82 83 84 85 86 87 88 89 90 91 92 93 94 95 def train (): x, y, coef = create_dataset() sample_dataset = TensorDataset(x, y) dataloader = DataLoader(sample_dataset, batch_size=16 , shuffle=True ) model = nn.Linear(in_features=1 , out_features=1 ) criterion = nn.MSELoss() optimizer = optim.SGD(model.parameters(), lr=0.01 ) epochs = 1000 epoch_losses = [] for epoch in range (epochs): epoch_loss = 0.0 batch_count = 0 for train_x, train_y in dataloader: y_pred = model(train_x) loss = criterion(y_pred, train_y.reshape(-1 , 1 )) optimizer.zero_grad() loss.backward() optimizer.step() epoch_loss += loss.item() batch_count += 1 avg_loss = epoch_loss / batch_count epoch_losses.append(avg_loss) if (epoch + 1 ) % 10 == 0 : print (f'Epoch [{epoch+1 } /{epochs} ], Loss: {avg_loss:.4 f} ' ) plt.figure(figsize=(12 , 5 )) plt.subplot(1 , 2 , 1 ) plt.scatter(x.numpy(), y.numpy(), alpha=0.6 , label='Original Data' ) x_test = torch.linspace(x.min (), x.max (), 100 ).reshape(-1 , 1 ) with torch.no_grad(): y_pred = model(x_test) plt.plot(x_test.numpy(), y_pred.numpy(), 'r-' , linewidth=2 , label='Fitted Line' ) w, b = model.weight.item(), model.bias.item() plt.title(f'Linear Regression: y = {w:.2 f} x + {b:.2 f} ' ) plt.xlabel('x' ) plt.ylabel('y' ) plt.grid(True ) plt.legend() plt.subplot(1 , 2 , 2 ) plt.plot(range (1 , epochs + 1 ), epoch_losses, 'b-' ) plt.title('Training Loss Curve' ) plt.xlabel('Epoch' ) plt.ylabel('Loss' ) plt.grid(True ) plt.tight_layout() plt.show() print (f'\nTraining completed!' ) print (f'Final parameters: weight = {w:.4 f} , bias = {b:.4 f} ' ) train()


